
Nissan Quest Type Radios - Removal
![]()
![]()
![]()
![]()
![]()
![]()
![]()
![]()
![]()
![]()
![]()
![]()
![]()
![]()
![]()
COLOR CODE:
![]()
![]()
![]()
NOTE DISCLAIMER: I will not accept liability for anyone's repair attempts. This information is posted for informational purposes only. Don't try this without proper training. Any repair attempts are at your own risk. It may not be the same problem that mine had. Don't hold me financially liable to any damage or expenses you may incur. This fix suggestion is not meant to put anyone's audio repair business out of business, etc,...
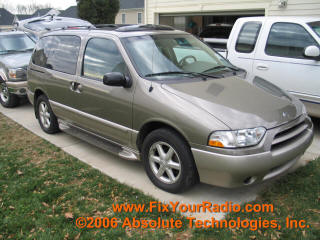
Figure 1 - '02 Nissan Quest
If you have one of these types of Nissan Quest (or Mercury Villager or Ford Windstar), then you may likely have one of the radios shown in Figure 2...and even more likely to be experiencing the blank display problem (and possible the CD eject problems). The following are the first steps to getting your radio working again. Once you have the radio out of the dash, then you may want to consider the Save My Sanity Swap program or the Do-It-Yourself repair...either way, once you have the radio out of the dash, you've practically done the hardest part of getting your radio fixed.
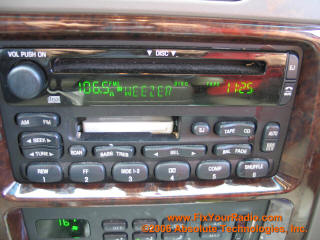
Figure 2 - '02
Nissan Quest
(same for Mercury Villager or Ford Windstar)
Figure 2 shows the neat feature of this radio in which the RDS feature is showing the artist (Weezer) of the song playing...you too, can see this, once you get your display fixed.
Getting your Radio out of a Nissan Quest (or Mercury Villager or Ford Windstar)
The first step to the radio repair is to remove the cup holder / ashtray from the dash. This is done by pushing in the two buttons (one on each side) as indicated in Figure 3 below.
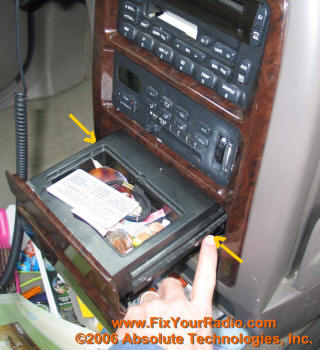
Figure 3 - Removing
Drink Tray / Ash Tray
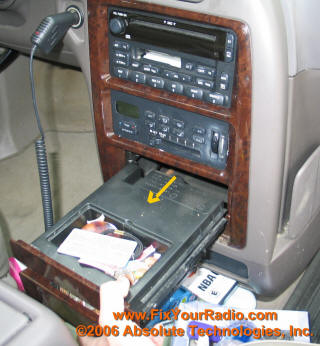
Figure 4 -
Tray Removed
Use your index finger to push in the buttons in on each side of the ashtray and then pull the tray out...it should slide all the way out of the panel.
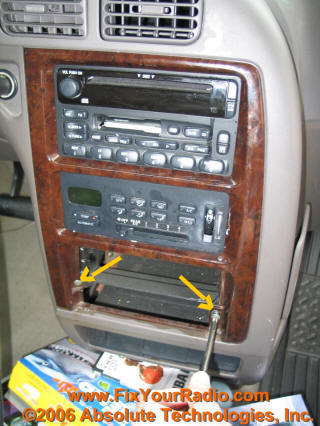
Figure 5 - Remove Two Screws
Using a phillips screwdriver, remove the two screws, one on each side, holding the front panel in place.
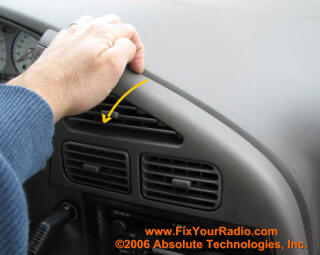
Figure 6 -
Pry Panel Loose
With the screws removed, position your fingers in the seam above the A/C vents where the panel connects to the dash. With a little luck, you should be able to pull this portion of the panel from the dash. It takes an action that pivots the panel at the bottom (below the ashtray) where it connects to the bottom. So, pull from the top, while pivots below where it connects.
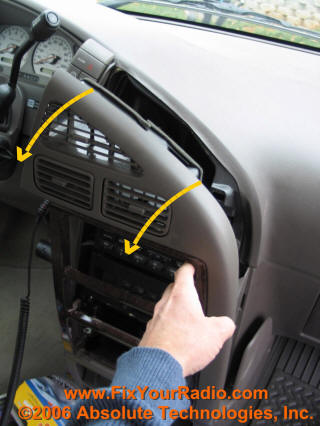
Figure 7 -
Panel Pivot
So, pull from the top, while pivoting below where it connects, as shown in Figure 7.
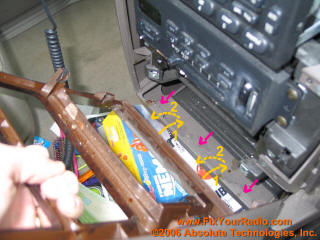
Figure 8 - Interlocking Tabs
In Figure 8, the pink arrows point to the interlocking tabs of the front dash. There are slots in the front panel (that you are trying to remove) that hook onto the tabs. Once you get the top loose and pulled from the dash, you should be able to push the bottom of the panel in (label step 1 in figure 8), then lift up and out (step 2 in figure 8). Your panel should be free to set aside.
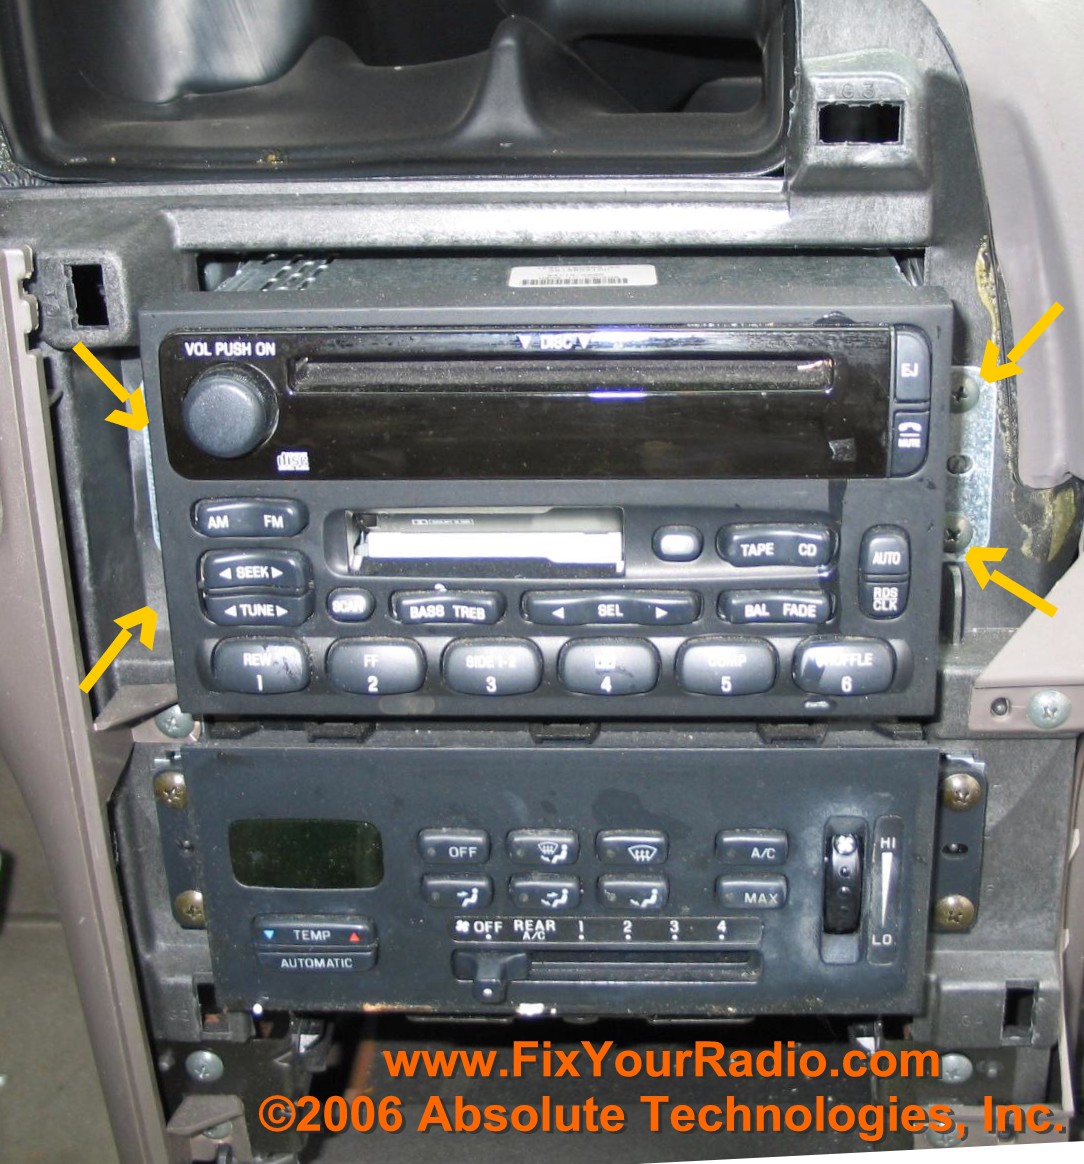
Figure 9 - Radio Screws
Remove the 4 screws shown in Figure 9 and then you should be able to slide your radio out of the dash (but it will still be connected to the wires within the dash)
.
Figure 10 - Back of Radio
Connectors
(this is actually a picture from an Explorer, but
the layout is the same buy you won't have the white plastic piece...if you are
that detailed oriented to notice that)
Figure 10 shows the three connectors and the antennae coax connection that needs to be removed. NOTE: You may only have TWO Connectors if your vehicle doesn't have a powered subwoofer...so don't be alarmed of you only have two plus the antennae. The order in which I remove these are numbered...first the antennae coax is disconnected, followed by the three connectors (installation is the reverse process...4, 3,2,1). Note that the connectors have tabs on them which need to be depressed to be able to pull the connector out of the radio.
You should now have your radio out of the dash...you can move on to the Fix!
DID YOU FIND THESE INSTRUCTIONS USEFUL?
If you have found these instructions useful, then please consider a donation. It helps keep this web site up and running and supports more development of this type material.
Thanks for your kind consideration.
To make a $3 donation using PayPal, click the donate button below...
To make donation of $3, $4, $5, or $10 using Google Checkout (or a credit card), make your selection below and click the Google Checkout button...
Again, thanks for your consideration.
If you are just using this site for the information to remove your radio and have found this information useful, then please consider giving a contribution to the effort and the time taken from my kids to get these directions together (and to help defray the hosting fees incurred to keep this information posted). PayPal makes it easy to contribute $3 or whatever you feel is appropriate:
Thanks!
D. Harrison
HERE ARE THE AVAILABLE FIXES FOR THE RADIO SHOWN ABOVE IN FIGURE 2:

Click one of the above Icons to Purchase the Radio Repair Access
(for Blank Display or Volume Control Repair Instructions)
$19.99
CD EJECT ERROR
ACCESS (Ford/Nissan)

Click one of the above Icons to Purchase the CD Eject Error Access
(For CD Eject Error Repair Instructions - separate cost from the
display and volume control repair listed above)
$19.99
COMBO REPAIR - DISPLAY/VOLUME
CONTROL/CD EJECT ERROR ACCESS
(Ford/Nissan)
Click one of the above Icons to Purchase the
Combo Display/Volume/CD Eject Error Access
$29.99
"Save My Sanity"
Repair Program

The Save My Sanity REPAIR PROGRAM has you ship your power supply board in for the repair and modifications to eliminate the blank display problem. You send your power supply board in for the repairs and all the modifications to your board to repair you board, even if you have tried the repairs yourself. The cost is $89.99. If I cannot fix your board, it will be returned without a charge and your payment will be returned.
Upon receipt of payment, I will send you specific, step by step picture-detailed instructions on how to remove the power board from the radio...it's not too hard. If you can get the radio out of the dash (the harder part of the task) , you can get the power supply board out of the radio. If once you receive the instructions you are unable to get the radio out or you think it's too much trouble, let me know and I can refund your payment.
What this new program will do for you is:
*You don't have to do the detailed soldering and trouble shooting.
*You get a known working board that has all the modifications to it so that
you won't experience this again
*If the board cannot be fixed, it will
be returned without cost to you.
*You don't have to go without your radio (if you were going to ship it off for
repairs). You will still be able to listen to your radio,
you just won't have a display (but then again, you didn't have a display
anyway).
Before going this route, please be sure that you are comfortable at the dis-assembly
and re-assembly that is required to replace the board...it basically requires
removing three screws, popping off the front display panel (may require a
small screw driver to assist), popping off the top metal panel of the radio,
then twisting two metal tabs with a needle nose pliers. If you are okay with
that (I will send the specific instructions including pictures to replace the
board), then you are set to proceed with the swap program.
This replacement board is for a MACH radio (also used in various Ford vehicles
and Nissan Quest)...the part number on the radio should be something like
"XXXX-18C868-XX" where the X's can be any type of combination...the "18C868"
should be there on this type of radio. You may want to verify this.
Click the above Icon to Purchase the
"Save My Sanity" Repair Program
using PayPal for $89.99.
Click the above Icon to Purchase the
"Save My Sanity" Repair Program
using Google Checkout for $89.99.
"Save My Sanity" Repair Program